Rib Stitch Patterns – How To Knit Ribbing
Every knitter needs to learn how to knit basic rib stitches because you’ll be using them quite a bit in your knitting.
And knowing these basic ribbing stitch patterns will help you when you start making all those cozy knit sweaters, hats and socks.
Ribbing is one of the best ways to create a stretchy form fitting piece of fabric.
Rib stitches are used for:
- necklines, cuffs and borders on sweaters
- waistlines
- cuffs on mittens, hats and socks
- scarves
- hems
- an allover stitch pattern
The list is endless. Whenever you want your knitting to snug up a little you can add some ribbing to it to get the effect you want.
For instance if you want a form-fitting top you can add some ribbing to the waistline.
First Common Rib Stitch Pattern
![]()
This is called the 1 X 1 rib stitch and what that means is that you’ll knit 1 stitch and purl 1 stitch all the way across your needle.
This ribbing is stretchy, reversible and looks lovely on garments.
You can knit 1 X 1 ribbing with either an odd number of stitches or an even number.
If you have an odd number of stitches then you work the ribbing as follows:
Row 1: Knit 1, Purl 1 across row
Row 2: Purl 1, Knit 1 across row.
Repeat row 1 and 2
If you have an even number of stitches then you’ll work every row the same:
Row 1: Knit 1, purl 1 across row
Then simply repeat row 1 until you have the length you need.
Second Common Rib Stitch Pattern
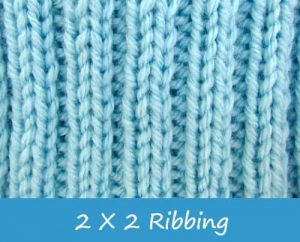
This is 2 X 2 ribbing and that means you knit 2 stitches and purl 2 stitches all the way across your needle.
This ribbing is a little more stretchy than the 1 X 1 ribbing it is also reversible.
2 X 2 Rib Stitch Pattern
If you want to try knitting the 2 X 2 rib you’ll need to cast on in multiples of 4 stitches so that means you’ll need to cast on 4, 8, 12, 16 or 20 sts.
Then you’ll knit the rib stitch pattern as follows:
Row 1: Knit 2, Purl 2 across the row
Row 2: Repeat row 1
Other Rib Stitch Pattern Variations
There are hundreds of pattern variations for ribbing that you can try too. You just have to play a little and see which ones you like.
- Knit 3, purl 3 – multiple of 6 stitches, so cast on 6, 12, 18, 24 sts
- Knit 4, purl 2 – this also is multiple of 6 stitches as above
- Knit 4, purl 4 – multiple of 8 stitches, so cast on 8, 16, 24, 32
Ribbing is so versatile and you can be as creative as you like. If you want a ribbing stitch pattern that’s really stretchy you may enjoy the 2 X 2 ribbing and even a 3 X 3 rib is nice and stretchy too.
How to Knit The Rib Stitch Knitting Instructions
When you knit ribbing you knit the knit stitches and purl the purl stitches stacking them onto each other row by row.
Have you ever seen a pattern that said to knit the knits and purl the purls?
Well it’s time to identify the knit stitches and the purl stitches and see what they look like before you start.
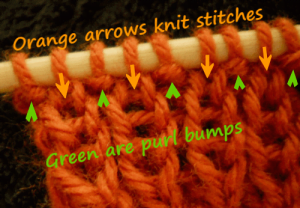
The knit stitch looks like little V’s and the purl stitches look like bumps.
In the photo I’ve just begun ribbing so the little V’s aren’t well defined yet but you can still see the little columns of knit stitches forming with the purl stitches in the background.
How to Cast off (bind off) in Rib Stitch