How to Read a Crochet Pattern
Let’s start with the basics: What is a crochet pattern? It’s a guide with a set of instructions, materials, and more that will have everything you need to know in order to make a specific crochet pattern.
Here, we’ll go over the common qualities of reading crochet patterns to fully understand them. Even though people and companies write their instructions differently, that doesn’t mean you can’t break it down to the basics of how to read a crochet pattern. You can at least count on these things to be there for you.
To best explain this, we will use Red Heart’s Citrus Smoothie Throw PDF instructions. This has nearly every aspect of a crochet pattern you’ll run into. You will also need to remember that USA crochet abbreviations are different to AUS/UK. For example double crochet in USA is actually AUS/UK treble crochet. USA use the term single crochet for AUS/UK double crochet. TIP; if you see anywhere in a pattern the term single crochet, this tells you that the pattern has been written in USA terminology and you will need to convert to AUS/UK. Sometimes the pattern will state which country’s terminology is being used. The Read Heart’s pattern is a USA pattern, however we have used it only to show pattern sections as they contain standard pattern information.
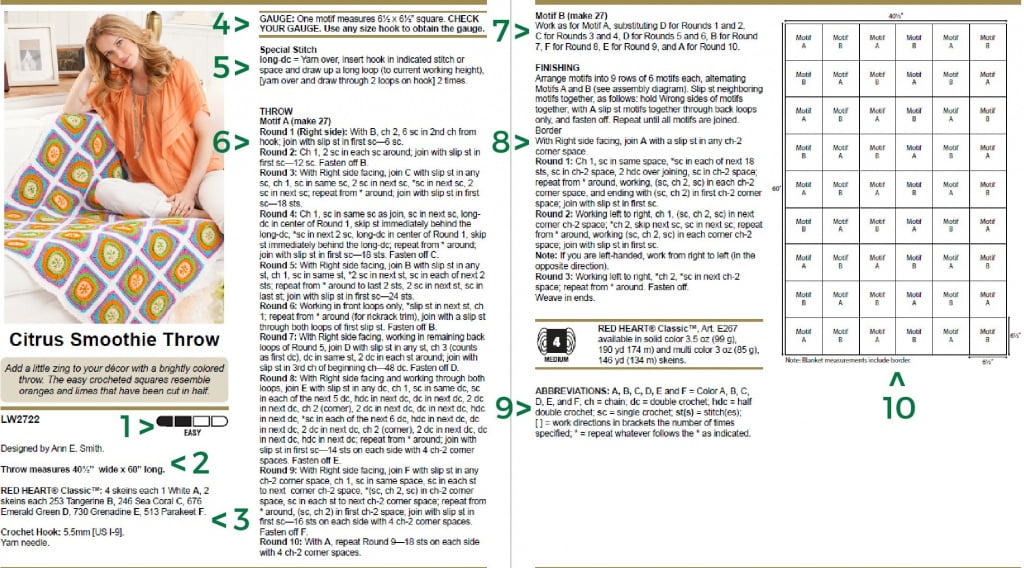
Overview: Looking at the pattern above, you’ll see a standard pattern for a crochet throw. It shows an image of the finished throw, the name, a description, and the designer of the piece. You’ll also see their reference number (LW2722). Then it goes into the pattern itself.
Reference the green numbers and arrows shown on the image above to correspond with the explanations here.
- Suggested Skill Level: This is either written or shown with an image. In this case, it’s an easy pattern. The other skill levels are beginner, intermediate, and advanced.
- Finished Size: A pattern should tell you what the finished size will be. Sometimes you’ll see a range of sizes or instructions on making your crochet project bigger or smaller.
- Materials List: Along with yarn type/weight and hook size needed – this will help you prepare before even getting started. Buy your yarn in the shade you want and make sure you have a crochet hook that goes along with it BEFORE you start.
- Gauge Requirements: This will clarify whether gauge is important for the project. If it is, it will tell you what measurements you need to meet with your hook and yarn.
- Special Stitches: If there are any unique or less well-known stitches used in the pattern, the pattern will explain what it is and how to work it.
- Pattern Instructions: Shown row-by-row (or round). This should be listed out with a row or round on each line, so it’s easy to follow and note where you are in the pattern at all times. This is where you will see abbreviations without explanations as to what they are. You need to know or check the guide while reading the pattern.
- Motifs: If your pattern has motifs, it will explain them. At the start of this particular set of pattern instructions, it said “Motif A (make 27)” and then after you have finished those, “Motif B (make 27)”. What is a motif? It is usually a square or repeated stitch pattern that is used to complete the full design. If you look at this throw, there are two different square designs. Those are the motifs.
- Finishing Instructions: This explains how to use what you have already crocheted to create the full piece. In this case, you will finish the throw by combining the two sets of motif designs. Most often, you will also see “Fasten off” and “Weave in ends” as the final steps.
- Abbreviations: As the chart shows above, this guide will usually appear after the pattern in company patterns but sometimes before the pattern in other crochet designer’s patterns. Abbreviations are needed because the specific punctuations help to simplify reading the crochet pattern.
- Diagram: This may be the assembly diagram or the diagram of specific stitches or techniques. If your pattern includes a diagram, it will be mentioned in the pattern (“see assembly diagram” for example). Most of the time it is easy to understand how to read a crochet diagram since it’s meant to help simplify the pattern. In this case, the diagram in the pattern image above shows how to assemble the motifs.